Next.js Tutorial for Beginners
November 21, 2025•33 min read
#Next.js#React#Next.js for Beginners#Next.js Tutorial#App Router
React is excellent for building user interfaces, but it doesn’t provide many of the tools needed to build a full web application. Out of the box, React doesn’t handle routing, server-side rendering, SEO optimization, API endpoints, or performance optimizations.
If you try to build a production-ready application with only React, you often end up installing and configuring many external libraries: React Router, Axios, Vite/Webpack, server frameworks, SSR tools, and more. Managing all of this yourself quickly becomes complicated and makes your code harder to maintain.
This is exactly the problem Next.js solves. Next.js combines React with routing, server rendering, data fetching, file-based organization, and backend logic, all in one environment and already configured for you. Instead of managing a collection of separate libraries on your own, Next.js gives you a complete, unified setup right from the start.
Prerequisite
Before you proceed, make sure you have:
- Basic knowledge of JavaScript and TypeScript
- Familiarity with React fundamentals (components, props, JSX)
- Node.js 20.9 or later installed on your computer. You can download it here.
Goals
- Understand the core concepts of Next.js and how the App Router works.
- Build a practical, real-world Movie Browsing App that applies each concept step by step.
You can explore the full project here:
Key Terms You Should Know
Before we dive into it, let’s clarify a few important technical terms you’ll see throughout this tutorial. Understanding these will help you follow along more easily:
- Routing: The process by which your application determines the page or content to display when a user visits a specific URL. In Next.js, routing is mostly file-based; you create folders and files, and each one automatically becomes a route in your app.
- Route: A route is simply a specific URL path in your application, like
/about,/contact, or/movies. URL paths such as/products/shoesare also routes. Each route represents a different page that a user can visit. - App Router: This refers to the setup in a Next.js application that
controls how pages are created and connected within your project. Next.js
reads the folders and files inside the
app/directory and automatically turns them into URLs. Each folder represents a segment of a route, and special files likepage.tsx,layout.tsx, andloading.tsxtell Next.js how that part of the app should behave. - Segment: A segment is a single part of a route, and in the App Router,
each segment is represented by a folder inside the
app/directory. For example, in the route/products/shoes, the segments areproductsandshoes.
What We’ll be Building
In this tutorial, we’ll build a Movie Browsing application that has:
- A homepage
- About page
- A movie page that fetches a list of popular films from a real public API
- Individual movie pages using dynamic routes to show movie details
- Loading and error states
- Clean, responsive UI styled with Tailwind
- Optimized images, metadata, and a shared layout
- A search bar where users can type to search for movies
By the end, you’ll have a strong foundation to start building your own production-ready Next.js applications.
Setting Up Next.js
Before we start writing any code, we need to create a new Next.js project. Fortunately, Next.js comes with a command-line tool that handles all the setup for you.
To create a new project, open your terminal and run:
npx create-next-app@latest my-appYou’ll be asked a few setup questions (TypeScript, Tailwind, the App Router, etc.). For this tutorial, simply press Enter to accept all the recommended defaults.
Once the installation finishes, move into your new project folder:
cd my-appThen start the development server:
npm run dev
You’ll see a local URL such as:
http://localhost:3000
Open it in your browser and you’ll see a fresh Next.js project already running.
At this point, you have everything you need to begin this tutorial.
- An
app/directory for routing - A default layout page
- A homepage
- A development environment that reloads automatically whenever you save changes.
If you open the project in your code editor, you’ll notice a clean structure. The app/ folder contains your routes, globals.css contains your global styles, and the rest of the files give you a fully configured foundation to start building immediately.
Remove Tailwind’s Default Styling
When you create a new Next.js project, Tailwind CSS comes preinstalled along with some default styles in app/globals.css. For this tutorial, we want a clean starting point so your project matches the screenshots and code samples exactly.
Open app/globals.css.
Keep the first line:
@import "tailwindcss";Then comment out or delete everything below it:
@import "tailwindcss";

/* :root {
  --background: #ffffff;
  --foreground: #171717;
}

@theme inline {
  --color-background: var(--background);
  --color-foreground: var(--foreground);
  --font-sans: var(--font-geist-sans);
  --font-mono: var(--font-geist-mono);
}

@media (prefers-color-scheme: dark) {
  :root {
    --background: #0a0a0a;
    --foreground: #ededed;
  }
}

body {
  background: var(--background);
  color: var(--foreground);
  font-family: Arial, Helvetica, sans-serif;
} */
Next, open app/layout.tsx and update it by commenting out the global CSS import:
// import "./globals.css"; // Comment out Tailwind’s default global styles

export const metadata = {
  title: "My Next.js App",
  description: "Learning Next.js step by step",
};

export default function RootLayout({
  children,
}: Readonly<{ children: React.ReactNode }>) {
  return (
    <html lang="en">
      <body>{children}</body>
    </html>
  );
}
(We will re-enable this import later when we get to Tailwind styling.)
This keeps Tailwind fully enabled, but removes the default styling so your layout and pages look exactly like the examples you’ll build throughout this tutorial.
Understanding the Folder Structure
After creating your Next.js project, one of the first things you’ll notice is that it comes with a clean, well-organized folder structure. This structure defines how your application works, where your pages live, and how routing works.
Here’s a quick overview of the most important parts:
my-app/
 ├─ app/
 │   ├─ layout.js
 │   ├─ page.tsx
 │   └─ globals.css
 ├─ public/
 ├─ package.json
 └─ next.config.js
1. app/
This is the heart of your application. Every folder and file inside app/ contributes to your routing system.
page.tsxcreates a routelayout.jsacts as a wrapper component that ensures common elements such as headers, footers, sidebars, and navigation bars remain consistent across multiple pages.- Folders inside
app/→ automatically become segments.
You’ll spend most of your development time inside this app/ folder.
2. public/
A place for static files such as images, icons, and fonts. Anything inside this folder can be accessed directly through the browser.
3. globals.css
Your global stylesheet. Any CSS code you place here applies to every page in the app. This file is also where Tailwind’s base styles are imported.
4. package.json
Tracks your project’s dependencies and scripts. When you run commands like npm run dev, this file is what makes it possible.
5. next.config.js
Your project’s configuration file. You’ll rarely need to touch it when starting out, but it becomes useful for optimizations and advanced features later.
Your First Steps Inside a New Next.js Project
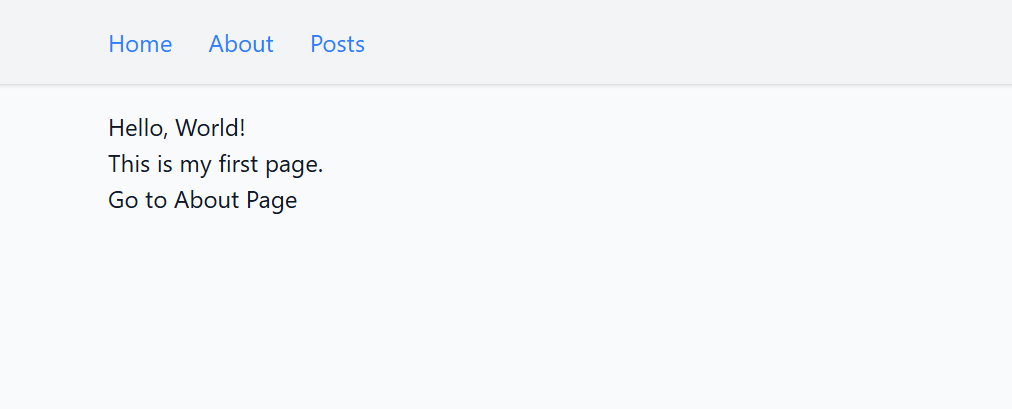
Let’s start by customizing the homepage so you can get a feel for how routing works in the App Router.
Open app/page.tsx, delete the existing default code, and replace it with:
export default function Home() {
  return (
    <main>
      <h1>Hello, World!</h1>
      <p>This is my first page.</p>
    </main>
  );
}
Save the file. Your browser will reload instantly, and you should see the content you just added on the homepage. This is one of the nicest parts of the App Router: every page.tsx file is automatically treated as a route.
Now, let’s create a second page to understand routing more clearly. Inside the app/ directory, create a new folder named about, and inside it, add a page.tsx file:
app/
├─ page.tsx
├─ layout.js
└─ about/
└─ page.tsx
In app/about/page.tsx, add this and save:
export default function About() {
  return (
    <main>
      <h1>About Page</h1>
      <p>This is the About page.</p>
    </main>
  );
}
Now open:
http://localhost:3000/about
Your new page is already live.
Why This Works
This is the core idea behind the App Router in Next.js:
Create a folder → add page.tsx → you get a new route.
There’s no routing configuration, no special APIs, and nothing else to set up. The folder structure is the routing system.
Adding Navigation with the <Link> Component
Now that we have multiple pages (Home and About), let’s make it easy for users to navigate between them.
In plain HTML, you’d normally use an <a> tag, but in Next.js, we use the <Link> component instead. The reason is simple: <Link> switches pages instantly without doing a full page reload, which makes your application feel much faster.
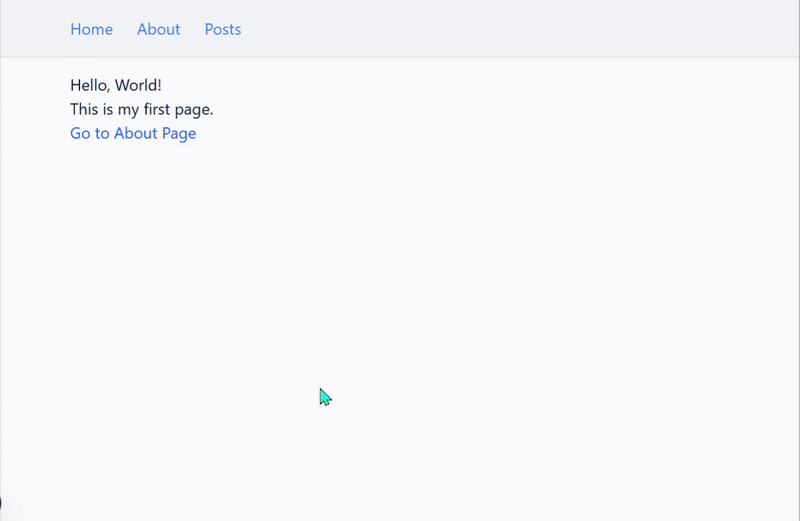
Open app/page.tsx (your homepage) and update it:
import Link from "next/link"; // New import for navigation

export default function Home() {
  return (
    <main>
      <h1>Hello, World!</h1>
      <p>This is my first page.</p>

      {/* New: Link to the About page */}
      <p>
        <Link href="/about">Go to About Page</Link>
      </p>
    </main>
  );
}
Now do the same for the About page so you can return home:
import Link from "next/link"; // New import for navigation

export default function About() {
  return (
    <main>
      <h1>About This App</h1>
      <p>This page lives at /about.</p>

      {/* New: Link back to the Home page */}
      <p>
        <Link href="/">Back to Home</Link>
      </p>
    </main>
  );
}
Now, go to your browser and try clicking the links.

Notice how the page changes instantly: no white flash, no loading delay, no full refresh. This is one of the reasons Next.js web applications feel fast and behave like mobile apps rather than websites.
Customizing the layout.js File
Every route in the App Router can have a layout file that wraps its pages. Think of it as the part of your application that holds the things you want to stay on the screen all the time. It’s the perfect place for things like a header, footer, or navigation bar.
Open app/layout.jsx, and you’ll see something like this:
import type { Metadata } from "next";
// import "./globals.css";

export const metadata: Metadata = {
  title: "Create Next App",
  description: "Generated by create next app",
};

export default function RootLayout({
  children,
}: Readonly<{
  children: React.ReactNode,
}>) {
  return (
    <html lang="en">
      <body>{children}</body>
    </html>
  );
}
Let’s add a simple header that will appear on every page:
import type { Metadata } from "next";
// import "./globals.css";
import Link from "next/link"; // New import for navigation

export const metadata: Metadata = {
  title: "Create Next App",
  description: "Generated by create next app",
};

export default function RootLayout({
  children,
}: Readonly<{
  children: React.ReactNode,
}>) {
  return (
    <html lang="en">
      <body>
        {/* New: Code for the header  */}
        <header style={{ padding: "1rem", background: "#4be9d6ff" }}>
          <nav style={{ display: "flex", gap: "1rem" }}>
            <Link href="/">Home</Link>
            <Link href="/about">About</Link>
          </nav>
        </header>

        <main style={{ padding: "1rem" }}>{children}</main>
      </body>
    </html>
  );
}
Save and refresh the browser. You’ll now see the header appear on every page.

You’ve now experienced one of the biggest benefits of layouts: you write code for things like headers or navigation bars once, and every page automatically uses them.
Your Project Now Has:
- A homepage
- An About page
- Navigation between them
- A layout that wraps everything with a consistent structure
This is already the foundation of every real-world Next.js project.
Data Fetching in Next.js
Now that your project has multiple pages, navigation, and a layout, it’s time to fetch real data. This is a crucial skill because our movie application project will rely heavily on fetching data from external APIs.
In Next.js, data fetching works differently from plain React. Most data is fetched on the server, not in the browser. This gives you:
- faster pages
- quicker load times
- better performance on slow devices
The key rule is:
In the App Router, any component that doesn’t have
"use client"at the top is a Server Component. This means the component runs on the server and can be used to fetch data directly.
Let’s see how this works.
Fetching Data in a Server Component
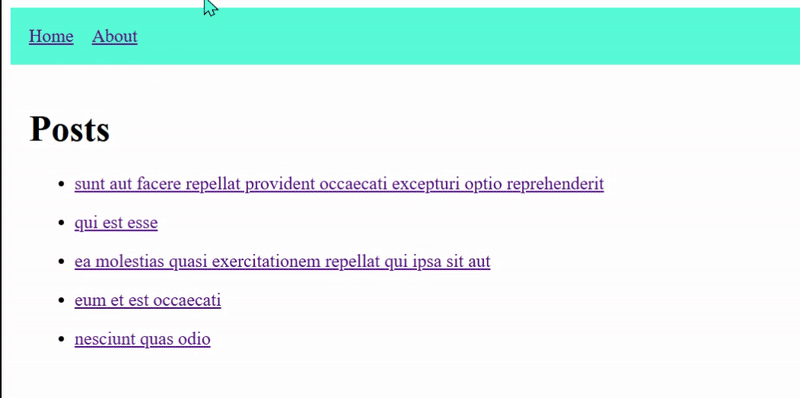
Create a new route called /posts:
app/
 ├─ page.tsx
 ├─ about/
 │   └─ page.tsx
 └─ posts/
     └─ page.tsx
Open app/posts/page.tsx and add:
type Post = {
  id: number,
  title: string,
  body: string,
};

export default async function PostsPage() {
  // This is a fake API, but perfect for learning
  const res = await fetch("https://jsonplaceholder.typicode.com/posts");
  const posts: Post[] = await res.json();

  return (
    <main>
      <h1>Posts</h1>
      <ul>
        {posts.slice(0, 5).map((post) => (
          <li key={post.id} style={{ marginBottom: "1rem" }}>
            <strong>{post.title}</strong>
            <p>{post.body}</p>
          </li>
        ))}
      </ul>
    </main>
  );
}
What This Code Does
- Defines a Post type so TypeScript knows the shape of the data you’re working with.
- Fetches data on the server by calling
fetchinside a Server Component. - Retrieves real posts from the JSONPlaceholder API and converts the response to JavaScript with
await res.json(). - Displays only the first 5 posts using
posts.slice(0, 5). - Renders each post inside a list.
Now, visit:
http://localhost:3000/posts
You’ll see the posts list instantly. Next.js fetches the data on the server, builds the HTML, and sends a complete page to the browser.
Updating Data in Next.js
Most of the time, the data you fetch in a Server Component won’t change very often. When that happens, Next.js automatically caches the data and serves it quickly to every visitor.
But what if your data does change?
Next.js gives you two simple ways to control how often your data should be updated.
1. Update the data every X seconds
If you want the page to update from time to time, add this at the top of your data fetching component:
export const revalidate = 60; // Refresh every 60 secondsNext.js will:
- serve the page instantly
- Update the data in the background.
- show the new data automatically after the time interval
This is great for pages that change occasionally, such as:
- “Latest Blog Posts” - updates when you publish a new article
- “Recent Projects” - updates after adding a new portfolio item
- “New Products” - when you add items to an online shop
- “User Testimonials” - updates when a new testimonial is added
2. Always fetch fresh data
Sometimes the information on your page changes all the time, or it depends on the specific user viewing it. In those cases, you don’t want Next.js to reuse old data, you want brand-new data every single time. To do that, you can disable caching:
fetch(url, { cache: "no-store" });With this, Next.js fetches fresh data on every request. This is great for things like a personal dashboard where someone’s stats update constantly, a page showing unread notifications, or any area where what the user sees must always be up to date the moment they open it.
The Simple Mental Model
- Default → data is cached
- Add
revalidate→ update occasionally. - Use
no-store→ always update.
These three rules are all you need to control how your application updates its data.
Dynamic Routes
In the previous section, you fetched and displayed a list of posts using the JSONPlaceholder API.
But showing a list is only the beginning. What if you want users to click on a post and then view the full details on its own page? That’s where dynamic routes come in. They allow you to create pages that adapt based on the specific item a user selects, such as a post, product, project, etc.
A dynamic route lets you generate pages like this:
/posts/1
/posts/2
/posts/3
You don’t manually create a page for every post. Instead, you use a folder with square brackets to capture the part of the URL that changes.
Let’s see how this works.
1. Create a Dynamic Folder:
In your app directory, create a new folder named [id] inside your posts folder like this:
app / posts / [id] / page.tsx;2. Add the Dynamic Page:
Inside app/posts/[id]/page.tsx, you can add a component to fetch the details for a specific post using the id from the URL:
export default async function PostDetailsPage({
  params,
}: {
  params: { id: string },
}) {
  const res = await fetch(
    `https://jsonplaceholder.typicode.com/posts/${params.id}`
  );
  if (!res.ok) {
    return <div>Could not load post.</div>;
  }
  const post = await res.json();
  return (
    <div>
      <h1>{post.title}</h1>
      <p>{post.body}</p>
      <p>
        <strong>Post ID:</strong> {post.id}
      </p>
    </div>
  );
}
This page automatically loads when a user visits /posts/1, /posts/2, or any other valid post ID.
Link to Dynamic Pages:
Now, in your main posts listing page (app/posts/page.tsx), add links to each individual post page. This should be your fully-updated app/posts/page.tsx:
import Link from "next/link";

type Post = {
  id: number,
  title: string,
  body: string,
};

export default async function PostsPage() {
  // This is a fake API, but perfect for learning
  const res = await fetch("https://jsonplaceholder.typicode.com/posts");
  const posts: Post[] = await res.json();

  return (
    <main>
      <h1>Posts</h1>
      <ul>
        {posts.slice(0, 5).map((post) => (
          <li key={post.id} style={{ marginBottom: "1rem" }}>
            <Link href={`/posts/${post.id}`}>{post.title}</Link>
          </li>
        ))}
      </ul>
    </main>
  );
}
Now, when a user clicks a post title, they’ll be taken to /posts/1, /posts/2, etc., and see the details for that specific post.
Why Dynamic Routes Are Useful
- They let you generate a unique page for each item in your data (posts, users, products, etc.).
- You only need one
[id]/page.tsxfile, no matter how many posts you have. - You can fetch and display information based on what’s in the URL.
Handling Loading and Error States in Next.js
Any time your application fetches data, two things can happen:
- The data takes a moment to load.
- Something goes wrong while loading it.
In plain React, you’d manage both situations yourself using useState, useEffect, and lots of conditional rendering. In the App Router, Next.js gives you a much simpler system: special files that automatically handle these states for you.
The idea is straightforward:
- Add a
loading.tsxfile → It shows while the route is fetching data. - Add an
error.tsxfile → shown when something goes wrong.
You don’t import anything or manually wrap your components. Next.js handles all the logic.
Adding a Loading State
Inside your app/posts/ folder, create a new file:
app/
 └─ posts/
      ├─ page.tsx
      └─ loading.tsx
Add this inside loading.tsx:
export default function Loading() {
  return <div style={{ padding: "1rem" }}>Loading posts...</div>;
}
Next.js will automatically show this whenever:
- The
/postsroute is fetching data. - The server takes a moment to render
- The response from the API is slow.
You don’t need to manage any state; it just works.
Now, try refreshing the /posts page and you’ll see the loading message appear briefly before the content.
You will notice that the loading message doesn’t just appear on the /posts page.
It also shows up when you click an individual post.
If you want a different loading message for individual post pages, you can create another loading.tsx inside the [id] folder.
Next.js uses the most specific loading file it finds.
Adding an Error State
Still inside the app/posts/ folder, create:
app/
 └─ posts/
      ├─ page.tsx
      ├─ loading.tsx
      └─ error.tsx
Add this inside error.tsx:
"use client";

interface ErrorProps {
  error: Error & { digest?: string };
  reset: () => void;
}

export default function Error({ error, reset }: ErrorProps) {
  return (
    <div style={{ padding: "1rem", color: "red" }}>
      <h2>Something went wrong.</h2>
      <p>{error.message}</p>

      <button onClick={reset} style={{ marginTop: "1rem" }}>
        Try again
      </button>
    </div>
  );
}
A few things to notice:
error.tsxmust be a Client Component, so it needs"use client".- If something goes wrong in
page.tsx, like a failed fetch, a bug in your code, or a network problem, Next.js will automatically show this error message to the user. reset()lets the user retry the page, triggering a new data fetch.
Try forcing an error in app/posts/page.tsx by using an incorrect API endpoint:
const res = await fetch("https://jsonplaceholder.typicode.com/invalid-url");When you visit /posts, Next.js will automatically:
- Show your custom error screen from
error.tsx - Provide the error message.
- allow the user to retry using
reset()
This demonstrates exactly how real data-fetching issues get handled in Next.js.
Why Loading and Error Files Matter
In traditional React:
- You write loading logic for every fetch.
- You write error logic for every fetch.
- You repeat the same code everywhere.
In Next.js:
- One
loading.tsxper route - One
error.tsxper route - Next.js handles everything automatically.
This keeps your code clean and free of repetitive boilerplate, especially as pages grow more complex.
Styling With Tailwind CSS
Up to this point, we’ve added small inline styles here and there just to keep things readable. Now it’s time to introduce a better way to style your application.
Tailwind CSS is one of the most popular ways to style Next.js apps. Instead of writing long CSS rules, you add small utility classes directly to your markup. It may look different at first, but it quickly becomes one of the most productive ways to style modern applications.
The best part?
Tailwind comes preconfigured when you create a new Next.js project, so you don’t need to install anything else. You can start using it immediately inside your project.
Styling Your Layout With Tailwind
Let’s update the layout you've built so far to look cleaner.
Open app/layout.tsx and update it to match the version below:
import Link from "next/link";
import "./globals.css";

export const metadata = {
  title: "My First App",
  description: "Learning Next.js step by step",
};

export default function RootLayout({
  children,
}: Readonly<{ children: React.ReactNode }>) {
  return (
    <html lang="en">
      <body className="bg-gray-50 text-gray-900">
        <header className="bg-gray-100 shadow-sm">
          <nav className="max-w-4xl mx-auto flex items-center gap-6 p-4">
            <Link href="/" className="text-blue-500 hover:underline">
              Home
            </Link>
            <Link href="/about" className="text-blue-500 hover:underline">
              About
            </Link>
            <Link href="/posts" className="text-blue-500 hover:underline">
              Posts
            </Link>
          </nav>
        </header>

        <main className="max-w-4xl mx-auto p-4">{children}</main>
      </body>
    </html>
  );
}
Look at your app now, it already feels more professional.
Styling a Page With Tailwind
Now let’s style your /posts page so it looks cleaner and more modern.
Update app/posts/page.tsx to the following:
import Link from "next/link";

type Post = {
  id: number,
  title: string,
  body: string,
};

export default async function PostsPage() {
  const res = await fetch("https://jsonplaceholder.typicode.com/posts");
  const posts: Post[] = await res.json();

  return (
    <div>
      <h1 className="text-2xl font-semibold mb-6">Posts</h1>

      <ul className="space-y-4">
        {posts.slice(0, 5).map((post) => (
          <li
            key={post.id}
            className="p-4 bg-white rounded-lg shadow-sm border"
          >
            <Link href={`/posts/${post.id}`} className="font-medium text-lg">
              {post.title}
            </Link>
          </li>
        ))}
      </ul>
    </div>
  );
}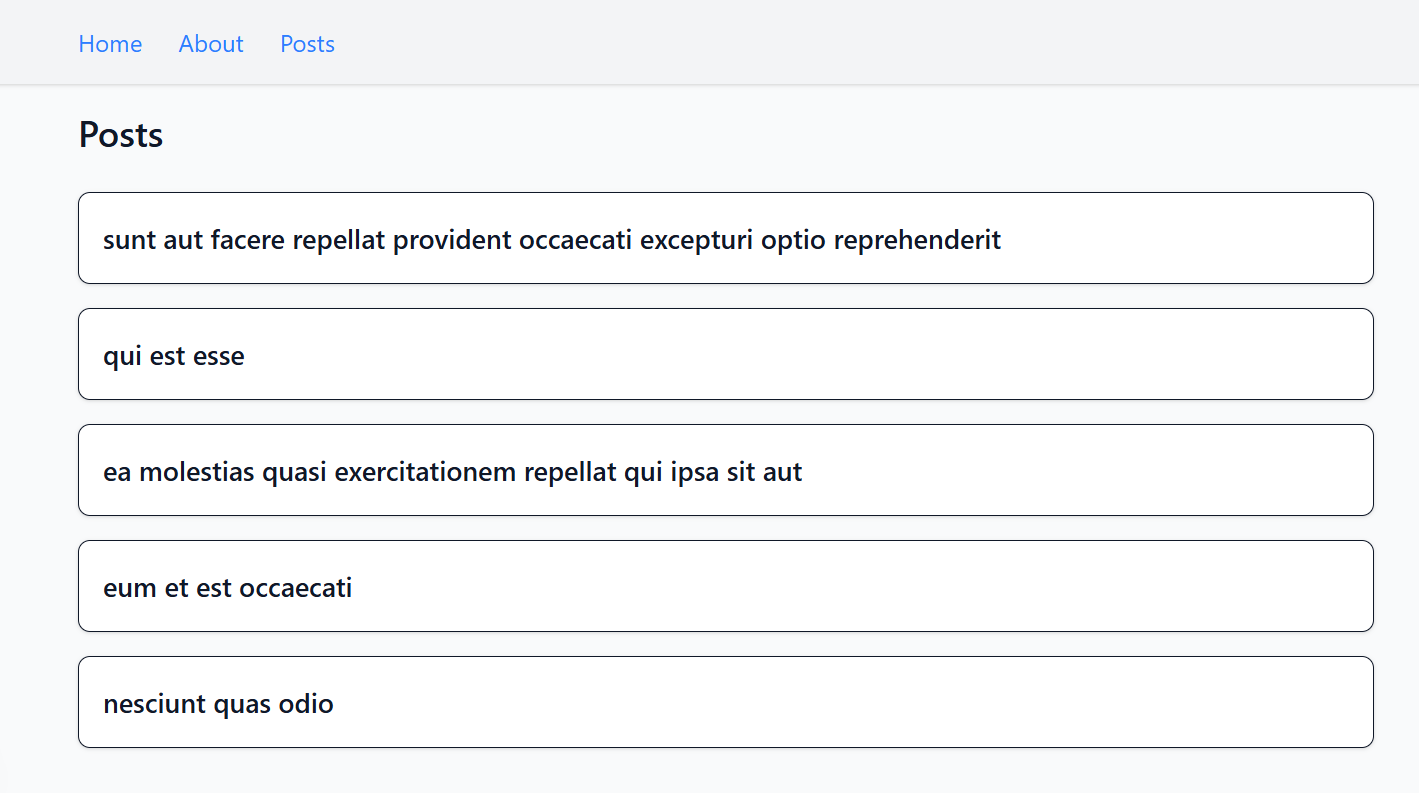
With just a few classes, your page now has:
- better spacing
- clearer typography
- a clean, readable layout
- modern card-style UI for each post
Using Images in Next.js
Next.js comes with a built-in <Image /> component for displaying images. It replaces the regular <img> tag and gives you automatic optimizations such as:
- faster loading
- responsive sizes out of the box
- lazy loading
Let’s walk through it step by step.
1. Add an Image to Your Project
Place an image inside the public/ folder at the root of your project. Anything inside public/ can be used directly in your components.
Example:
public/
 └─ test-image.png
2. Use the Image in a Page
Let’s display the image on the About page.
Open app/about/page.tsx and update it:
import Link from "next/link";
import Image from "next/image";

export default function About() {
  return (
    <main>
      <h1 className="text-2xl font-semibold mb-4">About This App</h1>

      <Image
        src="/laptop.png"
        alt="Laptop illustration"
        width={500}
        height={350}
        className="rounded-lg shadow-md mb-4"
      />

      <p>This page lives at /about.</p>

      <p className="mt-4">
        <Link href="/" className="text-blue-600 hover:text-blue-800">
          Back to Home
        </Link>
      </p>
    </main>
  );
}
What This Code Does
- The image file sits inside the
public/folder. - You reference it with
src="/test-image.png" - You must provide
widthandheight. - Next.js automatically optimizes the image for speed becuase you are using the
<Image>component.
This gives you a clean, responsive image without writing CSS or resizing anything manually.
Now, when you visit the about page, you will see the image displayed there.
Building a Movie Browsing App
Now that you’ve learned the core parts of Next.js: pages, routing, layouts, data fetching, loading states, error handling, styling, and images, it’s time to put everything into practice by building a real project.
In this section, you’ll create a Movie Browsing App that:
- fetches movie data from a public API
- lists movies on a dedicated page
- shows details for each individual movie
- Users can search for movies.
- uses loading and error states
- and uses Tailwind styling to keep everything clean and modern
This project will bring together every concept you’ve learned so far and show you how they work in a real, practical scenario.
Let’s begin by setting up the movies route and fetching real movie data.
Choosing a Movie API
To build our Movie App, we will need real movie data: titles, posters, release dates, and descriptions. Instead of creating our own backend, we will use a public API that provides this information for free.
For this article, we’ll use the TMDB (The Movie Database) API. It’s one of the most popular movie APIs because:
- It’s free to use
- It has a huge collection of movies.
- The documentation is beginner-friendly
- And it provides high-quality poster images.
Before we can fetch anything, you’ll need an API key. Don’t worry—it’s free and only takes a minute to get.
How to Get Your TMDB API Key
- Visit the TMDB website.
- Create a free account.
- Go to your Profile, then click Settings.
- Go to API → Request an API Key.
- Provide project and personal details.
- Copy your API key
We’ll store this key in an environment variable so it’s not visible in your code.
Add your API Key to ".env.local"
In the root of your project, create a new file called:
.env.local
Then add:
TMDB_API_KEY=your_api_key_hereNext.js automatically loads environment variables from this file, so you can use the key inside your server components without exposing it to the browser.
Creating the "/movies" Page
Now that you have your TMDB API key, let’s build the first real page of the Movie App.
Start by creating the route:
app/
 └─ movies/
      └─ page.tsx
Inside app/movies/page.tsx, add the following code:
import Image from "next/image";

type Movie = {
  id: number,
  title: string,
  overview: string,
  poster_path: string | null,
};

export default async function MoviesPage() {
  const res = await fetch(
    `https://api.themoviedb.org/3/movie/popular?api_key=${process.env.TMDB_API_KEY}`
  );

  if (!res.ok) {
    throw new Error("Failed to fetch movies");
  }

  const data = await res.json();
  const movies: Movie[] = data.results;

  return (
    <div>
      <h1 className="text-2xl font-semibold mb-6">Popular Movies</h1>

      <ul className="grid grid-cols-2 md:grid-cols-3 lg:grid-cols-4 gap-6">
        {movies.map((movie) => (
          <li
            key={movie.id}
            className="bg-white rounded-lg shadow-sm border overflow-hidden"
          >
            <div className="relative w-full h-72">
              <Image
                src={
                  movie.poster_path
                    ? `https://image.tmdb.org/t/p/w500${movie.poster_path}`
                    : "/placeholder.png"
                }
                alt={movie.title}
                fill
                className="object-cover"
              />
            </div>

            <div className="p-4">
              <h2 className="font-medium text-lg mb-2">{movie.title}</h2>
              <p className="text-gray-700 text-sm line-clamp-3">
                {movie.overview}
              </p>
            </div>
          </li>
        ))}
      </ul>
    </div>
  );
}
What This Does
- Fetches the list of popular movies from TMDB
- Displays movie posters, titles, and descriptions
- Shows them in a responsive grid
- Uses Tailwind for styling
- Throws an error automatically if the request fails
Working With Images From an API
The movie posters in this project come directly from the TMDB API. Since these images are not stored inside your project, Next.js treats them as external images, and the <Image /> component needs permission to load and optimize them.
To enable this, open your next.config.js file and update it:
import type { NextConfig } from "next";

const nextConfig: NextConfig = {
  images: {
    remotePatterns: [
      {
        protocol: "https",
        hostname: "image.tmdb.org",
      },
    ],
  },
};

export default nextConfig;
This tells Next.js that it’s allowed to download and optimize images from TMDB’s servers.
Once this is set up, the <Image /> component will:
- automatically optimize each poster
- serve the best image size for each device
- lazy-load images as the user scrolls
- And improve overall performance.
If you now visit:
http://localhost:3000/movies
You’ll see your first real movie list with optimized poster images.
Creating a Movie Details Page
Now that your /movies page shows a list of popular movies, let’s make each movie clickable so users can view more information about each movie. In Next.js, this is done using a dynamic route.
Step 1: Create the Dynamic Route Folder
Inside your app/movies folder, create a new folder named [id] and add a page.tsx file inside it:
app/
 └─ movies/
      ├─ page.tsx
      └─ [id]/
           └─ page.tsx
Step 2: Write the Details Page
Add the following to app/movies/[id]/page.tsx:
import Link from "next/link";
import Image from "next/image";

type MovieDetails = {
  id: number,
  title: string,
  overview: string,
  release_date: string,
  poster_path: string | null,
};

export default async function MovieDetailsPage({
  params,
}: {
  params: { id: string },
}) {
  const { id } = await params;
  const res = await fetch(
    `https://api.themoviedb.org/3/movie/${id}?api_key=${process.env.TMDB_API_KEY}`
  );

  if (!res.ok) {
    throw new Error("Failed to load movie details");
  }

  const movie: MovieDetails = await res.json();

  return (
    <div className="max-w-4xl mx-auto py-6">
      <div className="flex flex-col md:flex-row gap-8 items-start md:items-center">
        {/* Image */}
        <div className="md:w-1/3">
          <Image
            src={
              movie.poster_path
                ? `https://image.tmdb.org/t/p/w500${movie.poster_path}`
                : "/placeholder.png"
            }
            alt={movie.title}
            width={500}
            height={750}
            className="w-full rounded-lg shadow"
          />
        </div>

        {/* Text Content */}
        <div className="md:w-2/3">
          <h1 className="text-3xl font-semibold mb-4">{movie.title}</h1>
          <p className="text-gray-700 mb-4">{movie.overview}</p>
          <p className="text-gray-600 text-sm">
            Release Date: {movie.release_date}
          </p>
          <p className="mt-4">
            <Link
              href="/movies"
              className="bg-blue-600 text-white px-4 py-2 rounded hover:bg-blue-700"
            >
              Back to Movies
            </Link>
          </p>
        </div>
      </div>
    </div>
  );
}
What This Code Does
- Fetches movie details from the TMDB API.
- Checks whether the API request was successful, and if not, it displays an error message.
- Renders the movie poster, title, overview, and release date on the page.
- Provides a “Back to Movies” button using Next.js
<Link>for smooth navigation.
Step 3: Make Each Movie Clickable
Go back to app/movies/page.tsx and wrap each movie in a <Link>:
import Image from "next/image";
import Link from "next/link";

type Movie = {
  id: number,
  title: string,
  overview: string,
  poster_path: string | null,
};

export default async function MoviesPage() {
  const res = await fetch(
    `https://api.themoviedb.org/3/movie/popular?api_key=${process.env.TMDB_API_KEY}`
  );

  if (!res.ok) {
    throw new Error("Failed to fetch movies");
  }

  const data = await res.json();
  const movies: Movie[] = data.results;

  return (
    <div>
      <h1 className="text-2xl font-semibold mb-6">Popular Movies</h1>

      <ul className="grid grid-cols-2 md:grid-cols-3 lg:grid-cols-4 gap-6">
        {movies.map((movie) => (
          <li
            key={movie.id}
            className="bg-white rounded-lg shadow-sm border overflow-hidden"
          >
            <Link href={`/movies/${movie.id}`}>
              <div className="relative w-full h-72">
                <Image
                  src={
                    movie.poster_path
                      ? `https://image.tmdb.org/t/p/w500${movie.poster_path}`
                      : "/placeholder.png"
                  }
                  alt={movie.title}
                  fill
                  className="object-cover"
                />
              </div>

              <div className="p-4">
                <h2 className="font-medium text-lg mb-2">{movie.title}</h2>
                <p className="text-gray-700 text-sm line-clamp-3">
                  {movie.overview}
                </p>
              </div>
            </Link>
          </li>
        ))}
      </ul>
    </div>
  );
}
Now, each movie card is fully clickable.
Now, Visit:
localhost:3000/movies
Click a movie and you’ll be taken to /movies/12345 depending on the movie you selected.
You’ve now built:
- a dynamic route
- a details page with real movie data
- linking between pages
- And a clean UI styled with Tailwind
This is the foundation of a real-world movie browsing experience.
Adding Search Functionality
Right now, your Movie App can show popular movies and display details for each one. Let’s make it more useful by adding a search feature. This will allow users to type in a movie name and instantly see matching results from the TMDB API.
To make this work correctly, we’ll split the logic into two components:
- A Server Component: We will update
movies/pages.tsxto fetch all the movies and pass them to a new client component. - A New Client Component: We will create a new file
components/MoviesSearch.tsxinside a newcomponentsfolder that handles real-time search and displays the movie results
1. Update Your Existing /movies/page.tsx
Open app/movies/page.tsx and replace its contents with this:
import MoviesSearch from "@/components/MovieSearch";

type Movie = {
  id: number,
  title: string,
  overview: string,
  poster_path: string | null,
};

export default async function MoviesPage() {
  const res = await fetch(
    `https://api.themoviedb.org/3/movie/popular?api_key=${process.env.TMDB_API_KEY}`
  );

  if (!res.ok) {
    throw new Error("Failed to fetch movies");
  }

  const data = await res.json();
  const movies: Movie[] = data.results;

  return (
    <div>
      <h1 className="text-2xl font-semibold mb-6">Popular Movies</h1>
      <MoviesSearch movies={movies} />
    </div>
  );
}
What This Component Update Does
- Keeps your API key secure by fetching data on the server.
- Passes the list of movies to a separate client component for interactive searching.
- Makes the
/moviespage cleaner and easier to understand. - Separates data fetching (server) from UI logic (client).
2. Add a New Client Component: MoviesSearch.tsx
Now, create a new components folder at the root of your project and add a new file MoviesSearch.tsx inside it:
app/components/MoviesSearch.tsxAdd the following inside MoviesSeach.tsx
"use client";

import { useState } from "react";
import Image from "next/image";
import Link from "next/link";

type Movie = {
  id: number,
  title: string,
  overview: string,
  poster_path: string | null,
};

export default function MovieList({ movies }: { movies: Movie[] }) {
  const [query, setQuery] = useState("");

  const filteredMovies = movies.filter((movie) =>
    movie.title.toLowerCase().includes(query.toLowerCase())
  );

  return (
    <div>
      <input
        type="text"
        placeholder="Search movies..."
        className="w-full mb-6 p-2 border rounded-lg"
        value={query}
        onChange={(e) => setQuery(e.target.value)}
      />

      {filteredMovies.length === 0 && (
        <p className="text-gray-700">No movies found.</p>
      )}

      <ul className="grid grid-cols-2 md:grid-cols-3 lg:grid-cols-4 gap-6">
        {filteredMovies.map((movie) => (
          <li
            key={movie.id}
            className="bg-white rounded-lg shadow-sm border overflow-hidden"
          >
            <Link href={`/movies/${movie.id}`}>
              <div className="relative w-full h-72">
                <Image
                  src={
                    movie.poster_path
                      ? `https://image.tmdb.org/t/p/w500${movie.poster_path}`
                      : "/placeholder.png"
                  }
                  alt={movie.title}
                  fill
                  className="object-cover"
                />
              </div>

              <div className="p-4">
                <h2 className="font-medium text-lg mb-2">{movie.title}</h2>
                <p className="text-gray-700 text-sm line-clamp-3">
                  {movie.overview}
                </p>
              </div>
            </Link>
          </li>
        ))}
      </ul>
    </div>
  );
}
What This Component Does
- Runs in the browser (
use client) - Filters the movie list instantly as the user types
- Updates the UI in real time
- Displays a movie grid styled with Tailwind
- Makes every movie card clickable
Now, visit:
localhost:3000/movies
As you start typing into the search bar, the movie list updates instantly. And if the search doesn’t match any movie title, the message “No movies found.” appears.
Adding Loading and Error States
Whenever your Movie App fetches data from the TMDB API, there’s always a chance the request may be slow or fail. The App Router makes handling these moments incredibly simple using the two special files you learned about earlier in this article:loading.tsx and error.tsx.
We’ll add these to both:
/movies/movies/[id]
1. Loading State for the Movies Page
Inside your /movies folder, create a new file:
app/movies/loading.tsxAdd this:
export default function LoadingMovies() {
  return <p className="p-4 text-gray-700">Loading movies...</p>;
}
What This Does
- Next.js automatically shows this file anytime the
/moviespage is waiting for data. - The moment the movies are ready to display, this component disappears.
2. Error State for the Movies Page
Still inside the /movies folder, create:
app/movies/error.tsxAdd this:
"use client";

export default function MoviesError({
  error,
  reset,
}: {
  error: Error,
  reset: () => void,
}) {
  return (
    <div className="p-4 text-red-600">
      <h2 className="font-semibold text-lg mb-2">Could not load movies.</h2>
      <p className="mb-4">{error.message}</p>

      <button
        onClick={reset}
        className="px-4 py-2 bg-red-600 text-white rounded"
      >
        Try again
      </button>
    </div>
  );
}
Why This Must Be a Client Component
reset() re-tries the page’s fetch request, and because it relies on user interaction (a button click), the component must run in the browser.
How It Works
If your /movies page fails to fetch data:
- wrong API key
- network issue
- TMDB returns an unexpected response
Next.js automatically shows this error.tsx component.
3. Loading State for the Movie Details Page (/movies/[id])
Create the file:
app/movies/[id]/loading.tsxAdd:
export default function LoadingMovieDetails() {
  return <p className="p-4 text-gray-700">Loading movie details...</p>;
}
This appears the moment someone clicks a movie.
4. Error State for the Details Page
Create:
app/movies/[id]/error.tsxAdd:
"use client";

export default function MovieDetailsError({
  error,
  reset,
}: {
  error: Error,
  reset: () => void,
}) {
  return (
    <div className="p-4 text-red-600">
      <h2 className="font-semibold text-lg mb-2">Could not load this movie.</h2>
      <p className="mb-4">{error.message}</p>

      <button
        onClick={reset}
        className="px-4 py-2 bg-red-600 text-white rounded"
      >
        Try again
      </button>
    </div>
  );
}
If the fetch fails,for example, if the user visits an invalid movie ID, this is the component they’ll see.
Finalizing the Movie Browsing App
At this point, your Movie App can browse popular movies, search through them in real time, and display detailed information for each title. Before we wrap up, let’s make sure the rest of your project reflects the new direction.
We’ll update:
- the navigation bar
- the About page
- the Home page
This brings everything together and gives your app a polished, cohesive feel.
1. Updating the Navigation Bar
Earlier in the article, the navigation menu included a link to the /posts route. Now that the Movie App is the main feature, let’s remove the Posts link and add a Movies link.
Open app/layout.tsx and update it to:
import Link from "next/link";
import "./globals.css";

export const metadata = {
  title: "My Next.js App",
  description: "Learning Next.js step by step",
};

export default function RootLayout({
  children,
}: Readonly<{ children: React.ReactNode }>) {
  return (
    <html lang="en">
      <body className="bg-gray-50 text-gray-900">
        <header className="bg-gray-100 shadow-sm">
          <nav className="max-w-4xl mx-auto flex items-center gap-6 p-4">
            <Link href="/" className="text-blue-600 hover:text-blue-800">
              Home
            </Link>

            <Link href="/about" className="text-blue-600 hover:text-blue-800">
              About
            </Link>

            <Link href="/movies" className="text-blue-600 hover:text-blue-800">
              Movies
            </Link>
          </nav>
        </header>

        <main className="max-w-4xl mx-auto p-4">{children}</main>
      </body>
    </html>
  );
}
What This Fixes
- Removes the old Posts link
- Adds a new Movies link that leads to your Movie Browsing page
- Keeps the UI clean and consistent across all routes
2. Updating the About Page
Let’s refresh the About page and show how to use local images with Next.js.
Replace your existing About page with this updated version:
app/about/page.tsx
import Image from "next/image";

export default function About() {
  return (
    <main className="flex flex-col items-start justify-center min-h-[80vh] space-y-6">
      <div className="flex flex-col md:flex-row gap-8 items-start md:items-center">
        <Image
          src="/test-image.webp"
          alt="Test Image illustration"
          width={400}
          height={400}
          className="rounded-lg shadow-md mb-4"
        />

        <div>
          <h1 className="text-2xl font-semibold mb-4">About This App</h1>
          <p>
            This Next.js project teaches you how to work with the Nextjs core
            concepts to build a fully functional Movie Browsing Application.
          </p>
        </div>
      </div>
    </main>
  );
}
What Changed
- The page now uses
<Image />from Next.js - The content is clearer and more polished.
- Tailwind classes make the UI look cleaner.
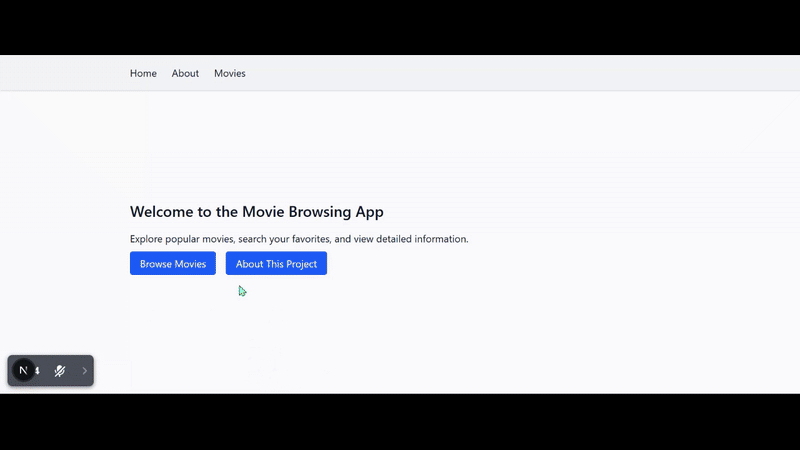
3. Updating the Homepage
Finally, update the Home page so it aligns with the project direction. Replace the previous placeholder text with a simple introduction:
app/page.tsx
import Link from "next/link";

export default function Home() {
  return (
    <main className="flex flex-col items-start justify-center min-h-[80vh] space-y-6">
      <h1 className="text-2xl font-semibold mb-4">
        Welcome to the Movie Browsing App
      </h1>

      <p className="mb-4">
        Explore popular movies, search your favorites, and view detailed
        information.
      </p>

      <p className="space-x-4">
        <Link
          href="/movies"
          className="bg-blue-600 text-white px-4 py-2 rounded hover:bg-blue-700"
        >
          Browse Movies
        </Link>

        <Link
          href="/about"
          className="bg-blue-600 text-white px-4 py-2 rounded hover:bg-blue-700"
        >
          About This Project
        </Link>
      </p>
    </main>
  );
}
By updating these final pieces, your application now includes:
- full navigation
- a polished About page
- a meaningful homepage
- dynamic movie browsing
- real-time search
- loading/error handling
- optimized images
- and a clean, modern UI
Deploying Your Next.js App
Once your Movie App is complete, the final step is to put it online so others can use it. The easiest and most reliable way to deploy a Next.js application is through Vercel, the platform created by the same team behind Next.js.
Deployment takes only a few minutes.
1. Push Your Project to GitHub
If you haven’t already, initialize a Git repository:
git init git add .
git commit -m "Initial commit"
Then create a new GitHub repository and push your project:
git branch -M main
git remote add origin https://github.com/your-username/your-repo-name.git
git push -u origin main
2. Deploy to Vercel
- Go to https://vercel.com/
- Sign in using GitHub
- Click “New Project”
- Search for the repository you just pushed to GitHub and click "import"
- Vercel will detect that it’s a Next.js project automatically
- Lastly, click deploy to publish your project
3. Add Your Environment Variables
Your Movie App uses the TMDB API key, so you need to provide that in the Vercel dashboard:
-
In your project on Vercel, go to Settings → Environment Variables
-
Add:
`TMDB_API_KEY = your_real_api_key_here`
- Click Save
- Press Redeploy
Vercel will rebuild your app with the new environment variables.
4. Wait for the Build to Finish
Vercel will:
- install your dependencies
- build your Next.js project
- optimize your images
- generate static pages
- deploy your server routes
When it’s done, you’ll get a live URL like:
https://your-app.vercel.app
You can share this link with anyone.
Your Movie App Is Live
With your application deployed, you now have:
- A complete Next.js project
- Real API integration
- Dynamic routes
- Search functionality
- Loading and error states
- Tailwind styling
- And a production-ready deployment
Conclusion
You’ve now built a complete Movie Browsing Application using Next.js.
By working through each step, you’ve learned the core concepts that power modern Next.js applications. At this point, you have the foundation needed to build real production-ready projects and confidently explore more advanced features such as server actions, caching strategies, authentication, and API routes.
If you’d like to follow more of my work, explore additional projects, or connect with me online, you can find me here:
GitHub: dboatengg LinkedIn: dboatengx
I'm Dickson Boateng, a software developer who enjoys teaching practical, beginner-friendly concepts to help developers build real-world applications. Thanks for following along and happy coding!